The secret to a smooth snowman is chilling the dough. Follow these steps for a professional, “non-lumpy” finish.
Step 1: The Cookie Crush
Place the standard Oreos (with the cream filling) into a food processor. Pulse until they are fine crumbs. If you don’t have a processor, place them in a heavy-duty zip-top bag and crush them with a rolling pin until no large chunks remain.
Step 2: Bind the Dough
In a large bowl, mix the cookie crumbs with the softened cream cheese. Use a hand mixer or a sturdy spoon to blend until a uniform, dark dough forms. There should be no white streaks of cream cheese visible.
Step 3: Shape and Chill
Roll the dough into 1-inch balls. Place them on a baking sheet lined with parchment paper. Crucial Step: Refrigerate the balls for at least 1 hour (or freeze for 20 minutes). If the balls are warm, they will fall apart when dipped in the hot candy melts.
Step 4: The Snowy Coating
Melt the white candy melts in the microwave in 30-second intervals, stirring until smooth. Using a fork, dip each chilled ball into the melted chocolate, tapping the fork on the side of the bowl to let excess drip off. Return to the parchment paper.
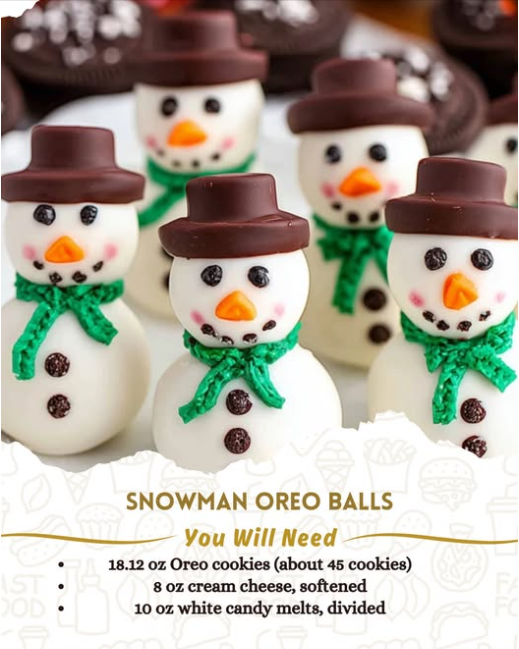
Step 5: Adding the “Snowman” Details
While the white coating is still wet, press a mini Oreo half onto the sides or top to create earmuffs or a hat. Add an orange sprinkle for the nose. Once the coating has hardened, use a toothpick dipped in dark chocolate (or an edible marker) to dot on the eyes and a coal-smile.
Service and Storage Tips
Service: Serve these chilled. They are quite rich, so they pair perfectly with unsweetened coffee or a glass of cold milk.
Storage: Because they contain cream cheese, these must be refrigerated. Store them in an airtight container for up to 5 days. They actually freeze beautifully! You can keep them in the freezer for up to 2 months; just thaw them in the fridge for an hour before serving to avoid condensation on the chocolate shell.
Variants
- Peppermint Snowmen: Add 1/2 teaspoon of peppermint extract to the cookie/cream cheese mixture for a “Polar” flavor.
- Red Velvet Snow: Use Red Velvet Oreos for a bright red surprise inside when someone bites into the snowman.
- Scarf Detail: Use a piece of fruit leather (Fruit by the Foot) to wrap around the base of the ball to look like a colorful winter scarf.
Tips for Success
- Smooth Dipping: If your melted chocolate is too thick, add a teaspoon of coconut oil or vegetable shortening. This thins it out and creates a beautiful, professional sheen.
- Avoid the “Feet”: When you place the dipped ball back on the parchment, move it slightly after a few seconds to prevent a large “pool” or “foot” of chocolate from forming at the base.
- Clean Hands: Keep your hands slightly damp when rolling the balls to prevent the dough from sticking to your palms.
Conclusion
Snowman Oreo Balls are a delightful way to bring a bit of edible art into your holiday celebrations. They take the beloved flavor of “cookies and cream” and package it in a festive, bite-sized form that appeals to the child in everyone. By taking the time to chill the dough and add those tiny mini-Oreo details, you create a treat that is as memorable for its looks as it is for its taste. Happy building!
Frequently Asked Questions
Q: Can I use white chocolate chips instead of candy melts?
A: You can, but white chocolate chips are more prone to seizing or becoming lumpy. Candy melts are specifically designed for dipping and will give you a much smoother “snow” finish.
Q: Why did my Oreo balls crack?
A: Cracking usually happens if there is a drastic temperature difference between the very cold ball and the very hot chocolate. Let the balls sit at room temperature for 2 minutes before dipping.
Q: My dough is too sticky to roll. What do I do?
A: Pop the entire bowl of dough into the fridge for 15 minutes to firm it up before you try to roll the individual balls.