ADVERTISEMENT
Phase 1: Combining and Melting
- **Prepare Pan and Cream:** Grease a $9\text{x}9\text{ inch}$ pan or line it with parchment paper, leaving an overhang on two sides. Warm the **1 cup of heavy cream** in a separate small saucepan or microwave (this prevents the mixture from seizing when added).
- **Start Cooking Base:** In a heavy-bottomed $4\text{ quart}$ saucepan, combine the **brown sugar, corn syrup, and salt**. Stir over medium heat until the sugar is fully dissolved. Once dissolved, stir in the **butter** until completely melted.
Phase 2: Boiling and Temperature Control
- **Add Cream and Target Temperature (TEMPERATURE CONTROL IMPERATIVE):** Slowly whisk the **warmed heavy cream** into the sugar mixture. Insert a candy thermometer, ensuring the tip does not touch the bottom of the pan. Bring the mixture to a full rolling boil. Continue boiling, **stirring constantly and slowly with a wooden spoon**, until the mixture reaches **$120^\circ\text{C}$ ($248^\circ\text{F}$)** for soft chew or **$122^\circ\text{C}$ ($252^\circ\text{F}$)** for firm chew (firm-ball stage).
- **Remove and Finish:** Immediately remove the saucepan from the heat once the target temperature is reached. Stir in the **vanilla extract**.
Phase 3: Setting and Cutting
- **Pour and Cool (SLOW STIR AND COOL PROTOCOL):** Immediately pour the caramel into the prepared pan. **Do not scrape the sides of the saucepan** (to avoid incorporating any potential crystals). Let the caramel cool completely and **undisturbed** at room temperature for at least **4 hours**, or until firm.
- **Cut and Wrap:** Once the caramel is firm, use the parchment overhang to lift it from the pan. Use a sharp, lightly oiled knife to cut the caramel into small squares. Wrap each piece in small squares of wax paper or parchment paper.
Serving and Storage: Retaining the Chew
Optimal handling for this chewy confection:
- **Serving:** Caramels are best enjoyed at room temperature for optimal chewiness.
- **Storage (Room Temperature):** Store wrapped caramels in an airtight container at cool room temperature for up to **3 weeks**.
- **Preventing Sticking:** The key to long storage is the wrapping (Step 6). Use non-stick wax paper squares, twisting the ends tightly.
Tips: Essential Techniques for Smoothness
Candy Thermometer Calibration: **Calibrate your thermometer** (Step 3) before use by placing it in boiling water. It should read $100^\circ\text{C}$ ($212^\circ\text{F}$). If it reads higher or lower, adjust your target temperature accordingly.
Warm Cream: Adding cold cream to the hot sugar mixture (Step 3) can cause the mixture to seize and may lower the temperature so drastically that it throws off the cooking time, leading to grainy caramel. Use **warmed heavy cream**.
Do Not Scrape: **Avoid scraping the sides** (Step 5) when pouring. Sugar tends to crystallize on the sides of the pan; scraping it into the final product can ruin the batch’s smooth texture.
Pan Choice: Use a **heavy-bottomed saucepan** (Step 2). This distributes heat evenly, preventing the sugar mixture from scorching on the bottom before the temperature target is reached.
Humidity Issues: Avoid making caramels on high-humidity or rainy days. Excess moisture in the air prevents the syrup from concentrating properly, leading to a softer, stickier caramel that won’t set firmly.
Variations: Customizing Flavor and Finish
Easily adapt the flavor profile of the caramel:
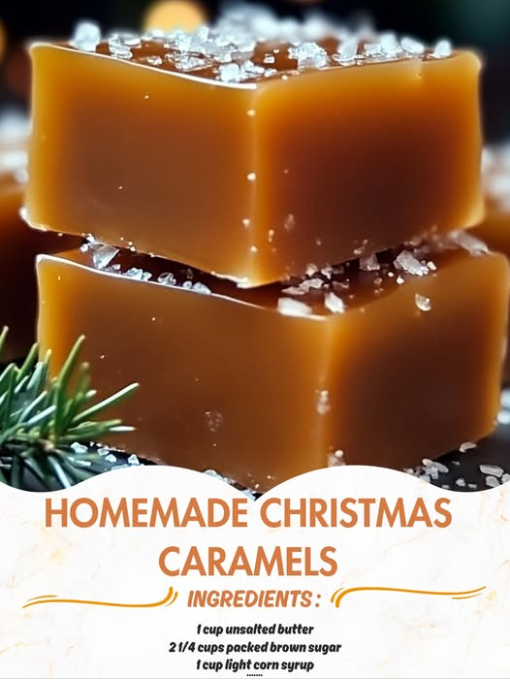
- **Sea Salt Finish:** Sprinkle the top of the caramel with **flaky sea salt** (like Maldon) immediately after pouring it into the pan (Step 5).
- **Chocolate Caramel:** Stir in $\frac{1}{2}\text{ cup}$ of **dark chocolate chips** along with the vanilla extract (Step 4).
- **Nutty Crunch:** Stir in **$\frac{1}{2}\text{ cup}$ of chopped pecans or walnuts** with the vanilla extract (Step 4).
- **Salted Caramel:** Increase the salt in the initial mixture to **$\frac{1}{2}\text{ tsp}$** (Ingredient I).
**Stirring is Vital:** Unlike crystalline candy like fudge, this caramel requires **constant, slow stirring** during the boil (Step 3) to prevent the milk solids from settling and burning on the bottom of the pan.
**Testing without a Thermometer:** Drop $\frac{1}{2}\text{ tsp}$ of the boiling syrup into a glass of ice-cold water. If the syrup forms a ball that holds its shape but is still pliable and chewy, it is at the firm-ball stage ($248^\circ\text{F}$ to $252^\circ\text{F}$) (Step 3).
**Cutting Surface:** For the cleanest cuts (Step 6), use a cold, flat surface like a marble slab or cutting board that has been chilled in the freezer for 10 minutes.
**Caramel Color:** The goal is a deep amber color, which should naturally occur due to the presence of brown sugar and milk solids. If you want a deeper color, cook the syrup for slightly longer, but **do not exceed $255^\circ\text{F}$ ($124^\circ\text{C}$)**.
Conclusion: Sweet Reward for Precision
The **Homemade Christmas Caramels** are the ultimate chewy confection, achieved through confectionery science. By adhering to **The Temperature Control Imperative** to set the proper concentration, strictly following **The Slow Stir and Cool Protocol** to maintain smoothness, and ensuring accurate ingredient ratios, you guarantee a perfect, non-gritty, melt-in-your-mouth candy. This precision-based recipe yields a festive, decadent treat that is worth every careful step.
Frequently Asked Questions (FAQ)
Q: Why is my caramel grainy?
A: The most common cause is **crystallization**. This happens if you stop stirring, scrape the sides when pouring, or if you didn’t use enough corn syrup (Step 3/5).
Q: Why did my caramel turn out too hard?
A: The mixture was **overcooked** (Step 3). The temperature exceeded $255^\circ\text{F}$ ($124^\circ\text{C}$), reaching the hard-ball stage. You must rely on a calibrated thermometer.
Q: Can I use milk instead of heavy cream?
A: **Not recommended** (Ingredient II). Milk has less fat and more water, which increases the likelihood of separation (breaking) and results in a less rich, potentially brittle caramel.
Q: Why did my caramel separate or look oily?
A: This is usually caused by **adding cold cream** to the hot sugar base (Step 3), which breaks the emulsion. Ensure the cream is warmed first.
ADVERTISEMENT