The complete ingredient list, detailing the three layered components:
I. For the Cookie Base (Tenderizing):
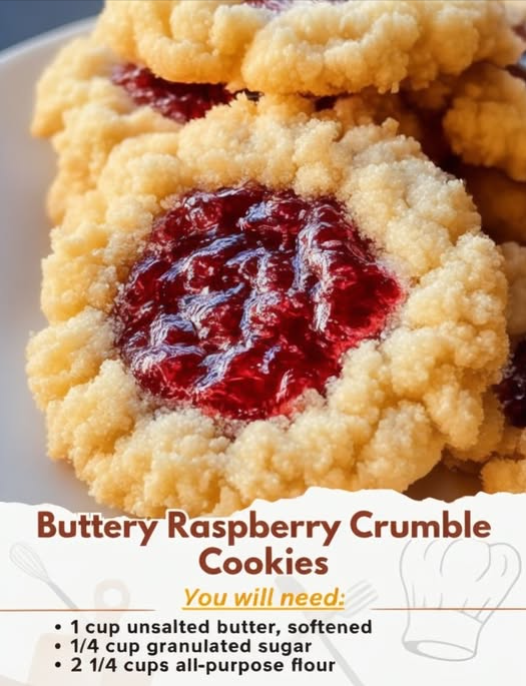
- **1 cup (2 sticks)** unsalted butter, softened
- **$\frac{1}{4}$ cup** granulated sugar
- **$\frac{1}{3}$ cup** powdered sugar
- **1 teaspoon** vanilla extract
- **2 cups** all-purpose flour
- **$\frac{1}{2}$ teaspoon** salt
II. For the Raspberry Filling (Stabilizing):
- **1 cup** fresh or frozen raspberries (no thaw needed)
- **2 tablespoons** granulated sugar
- **1 tablespoon** cornstarch (Thickening agent)
- **1 teaspoon** lemon juice (optional, for brightness)
III. For the Crumble Topping (Crunch):
- **$\frac{1}{2}$ cup** all-purpose flour
- **$\frac{1}{4}$ cup** granulated sugar
- **$\frac{1}{4}$ cup** cold unsalted butter, cut into small cubes
Instructions: Mix, Fill, and Crumble
Phase 1: Preparing the Crumble and Filling
The crumble must be prepared first so the butter stays cold, and the filling should be prepared last just before assembly to minimize moisture release.
- **Make the Crumble (COLD BUTTER):** In a small bowl, whisk together the **$\frac{1}{2}$ cup flour** and **$\frac{1}{4}$ cup sugar**. Use a pastry blender or your fingertips to cut in the **$\frac{1}{4}$ cup cold unsalted butter cubes** until the mixture resembles coarse crumbs. Place in the freezer while preparing the rest of the recipe.
- **Make the Filling (STARCH STABILIZATION):** In a separate bowl, gently toss the **1 cup raspberries** with the **2 tablespoons sugar**, **1 tablespoon cornstarch**, and **1 tsp lemon juice**. Set aside.
Phase 2: Preparing the Cookie Base
- **Cream Fats and Sugars:** In a large mixing bowl, beat the **1 cup softened unsalted butter**, **$\frac{1}{4}$ cup granulated sugar**, and **$\frac{1}{3}$ cup powdered sugar** until light and fluffy (Direction 1). Beat in the **1 teaspoon vanilla extract**.
- **Add Dry Ingredients (MINIMAL GLUTEN):** In a separate bowl, whisk together the **2 cups all-purpose flour** and **$\frac{1}{2}$ teaspoon salt**. Gradually add the dry mixture to the wet mixture, mixing on low speed until *just combined* to form a soft dough. **Do not overmix.**
Phase 3: Assembly and Baking
- **Prep Pans and Dough:** Preheat oven to **$350^\circ\text{F}$ ($175^\circ\text{C}$)**. Line two baking sheets with parchment paper. Scoop the dough into **2 Tablespoon-sized balls** (assumed portion).
- **Create Wells:** Place the dough balls 2 inches apart on the baking sheet. Use the back of a teaspoon or your thumb to create a **shallow indentation or well** in the center of each cookie (assumed step).
- **Fill:** Spoon approximately **1 teaspoon of the raspberry filling** into the center well of each cookie.
- **Top and Bake:** Sprinkle a generous amount of the **chilled crumble topping** (from freezer) over the filling. Bake for **12–15 minutes**, or until the edges of the cookie are lightly golden brown and the crumble is golden.
- **Cool Completely:** Remove from the oven. Cool the cookies on the baking sheet for **5 minutes**. Transfer them carefully to a cooling rack to cool completely before serving.
Serving and Storage: Protecting the Crunch
Proper storage is essential to maintain the structural integrity of the crumble:
- **Yield and Serving:** Yields about **20-24 cookies**. Serve cooled.
- **Storage:** Store cooled cookies in an airtight container at **room temperature** for up to **5 days**. Avoid storing in the refrigerator, as the moisture can soften the shortbread base and the crumble topping.
- **Freezing:** **Baked and cooled** cookies can be frozen for up to 3 months. Thaw overnight at room temperature. The unbaked dough can also be scooped, filled, and frozen, then baked from frozen, adding a few minutes to the bake time.
Tips: Essential Techniques for Best Texture
The Crumbly Top Secret: When mixing the crumble (Step 1), if you overwork the butter, it will melt. If this happens, place the mixture **back in the freezer** for 10 minutes before topping the cookies.
Softened Butter for the Base: The **1 cup butter** for the cookie base (Step 3) must be truly *softened* (room temperature). Cold butter will not cream properly, resulting in a dense, chewy cookie rather than a tender, shortbread-style base.
The Cornstarch Function: The **1 tablespoon cornstarch** (Step 2) is absolutely vital for the filling. Do not omit it, or the raspberry juice will run out during baking and cause the cookie to stick to the pan and become soggy.
Measuring Flour: Use the **spoon-and-level method** when measuring flour (Step 4) to avoid packing it. Too much flour will make the cookie base dry and crumbly, defeating the purpose of the high-fat recipe.
Frozen Fruit Advantage: If using frozen raspberries (Step 2), they hold their shape better during mixing and baking, often leading to a more defined filling center.
Variations: Customizing Fruit and Flavor
Easily adapt the fruit and spice profile:
- **Blueberry Crumble:** Substitute the raspberries with an equal amount of **fresh or frozen blueberries**.
- **Peach Crumble:** Use **finely diced peaches** (fresh or thawed, patted dry) in place of raspberries. You may need to increase the cornstarch to $1 \frac{1}{2}$ tablespoons due to the high water content.
- **Almond Crumble:** Add **$\frac{1}{4}$ teaspoon of almond extract** (Step 3) to the cookie base and replace $\frac{1}{4}$ cup of the flour in the crumble (Step 1) with **finely ground almonds** (almond meal).
- **Spice Note:** Add a pinch of **cinnamon or nutmeg** to the crumble topping (Step 1) for a warm, spiced undertone.
**Cookie Spread:** These cookies don’t spread much, but you must still keep them **2 inches apart** (Step 6) to allow the heat to circulate evenly and crisp the sides.
**Creating Uniform Wells:** Use a measuring spoon (like a $\frac{1}{2}$ teaspoon) coated in flour to press the wells (Step 6). The flour prevents sticking, and the measurement ensures uniform thickness.
**Preventing Burned Bottoms:** If your oven heats unevenly, place the baking sheets on the **middle rack** and use two layers of parchment paper (Step 5) to insulate the bottoms slightly.
**Optional Glaze:** For an extra flourish, drizzle a simple glaze (powdered sugar mixed with a splash of milk or lemon juice) over the *cooled* cookies.
Conclusion: A Three-Layered Triumph
The **Buttery Raspberry Crumble Cookie** stands out as a sophisticated yet accessible bake. By focusing on the **tenderizing power of powdered sugar** in the base, the **stabilization of the fruit filling with cornstarch**, and the necessary **cold butter technique** for the crumble, you guarantee a cookie with perfect flavor and texture. This three-layered treat is guaranteed to satisfy any craving for comfort and fruit, all in a delightful, handheld form.
Frequently Asked Questions (FAQ)
Q: Why did my cookie base spread too much?
A: The butter was likely **too warm** (Step 3). Ensure the **1 cup unsalted butter** is only slightly softened. If the dough feels overly sticky after mixing, **chill it for 15 minutes** before scooping.
Q: My raspberry filling ran out and made the cookie soggy.
A: The **cornstarch was insufficient or not activated** (Step 2). Ensure the **1 tablespoon cornstarch** is thoroughly mixed with the sugar and raspberries to absorb the moisture released during baking.
Q: Can I use oil instead of butter in the cookie base?
A: **No.** (Step 3). The cookie’s texture relies entirely on the creaming of solid butter with sugar to incorporate air and structure. Oil would result in a dense, greasy, and flat cookie.
Q: Why is my crumble topping more like a paste?
A: The butter (Step 1) became **too warm** and was overworked. The butter must be cold and worked in minimally until only coarse crumbs form (The Cold-Butter Crumble Technique).