ADVERTISEMENT
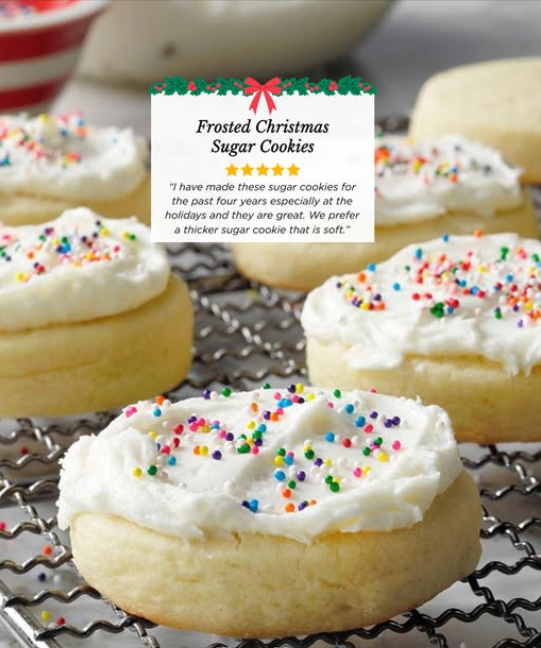
The Frosted Sugar Cookie requires a duality of ingredients—one set for the structural integrity and flavor of the cookie, and another for the stability and sweetness of the frosting. The precision in fat ratios is critical.
The Cookie Dough Pillars:
- Butter: The primary flavor and shortening agent. Butter’s water content (around 15-20%) and melting point are crucial. When creamed with sugar, the air beaten into the butter creates tiny pockets that expand upon baking, giving the cookie lift and tenderness. Using a **high-quality, European-style butter** (with higher fat content) yields superior flavor and a more tender crumb.
- Eggs (Whole and Yolks): The emulsifier and richness booster. The **yolks** are pure fat and lecithin, a powerful emulsifier. Adding extra yolk increases the overall fat content, actively hindering the formation of gluten (which causes toughness) and ensuring a moist, cake-like density that is less prone to cracking when handled. The whole egg provides necessary liquid and protein for overall structure.
- Granulated Sugar: The tenderizer and sweetener. In the dough, granulated sugar not only provides sweetness but also physically cuts through the fat (creaming action) and absorbs moisture, helping to tenderize the cookie by competing with the flour for water.
- Flour and Leavening (Supporting Structure): Although not listed in detail, **all-purpose flour** provides the main structure (gluten and starch), and a precise amount of **baking powder or soda** provides the necessary lift to achieve a cake-y crumb rather than a flat, crispy one.
The Frosting Structure and Sweetness:
- Butter (Frosting): Provides the necessary rich, dairy flavor. However, used alone, its low melting point (around $90^\circ\text{F}$ / $32^\circ\text{C}$) makes the frosting unstable and prone to melting off the cookie.
- Shortening: The stability champion. Shortening is 100% fat and has a much higher melting point than butter. Adding it to the frosting makes the buttercream stable, easier to pipe, and resistant to warmth. It prevents the frosting from becoming rock-hard in the refrigerator or weeping on a warm platter.
- Confectioners’ Sugar: The frosting’s bulk and smoothness. Unlike granulated sugar, confectioners’ sugar (powdered sugar) contains a small amount of cornstarch, which prevents caking and helps stabilize the frosting by absorbing moisture. Its fine texture is what results in a smooth, cloud-like consistency.
Summary: The ratio of fat—the mix of butter’s flavor with shortening’s stability—is the governing factor that controls the final texture and presentation of the frosted cookie.
Instructions: Methodical Mixing for Texture Control
The baking process is split into two phases: creating the tender dough and mixing the stable frosting. Precise technique is more important than speed.
Phase 1: Dough Preparation and Baking (Focus on Crumb)
- The Creaming Action: Cream the **softened butter** and **granulated sugar** together on medium-high speed until the mixture is light, fluffy, and visibly paler in color. This takes 3–5 minutes and incorporates air, which is essential for a cake-y texture.
- Egg Emulsification: Beat in the **whole eggs and egg yolks** one at a time, allowing each to fully incorporate before adding the next. This ensures proper emulsification, preventing the dough from separating.
- Dry Integration: Gently mix in the flour, salt, and leavening agents. **Mix only until the dough comes together.** Overmixing develops gluten, which will result in a tough, chewy cookie instead of a tender, crumbly one.
- Chilling Regulation: Flatten the dough into a disc, wrap it tightly, and **chill for at least 1–2 hours.** Chilling solidifies the butter, making the dough easy to roll and cut, and preventing the cookies from spreading too much in the oven.
- Baking: Roll, cut, and bake the cookies according to temperature guidelines (typically $350^\circ\text{F}$ / $175^\circ\text{C}$) until the edges are just barely golden. Pulling them out slightly early ensures maximum tenderness.
Phase 2: Frosting Creation (Focus on Stability)
- Fat Combination: Combine the **softened butter** and **shortening** in a clean bowl. Beat on medium speed until the mixture is smooth and completely homogenous.
- Sugar and Liquid: Gradually add the **confectioners’ sugar** to the fat mixture, alternating with small amounts of **milk or water** (the recipe’s liquid component) and **vanilla extract**. Start slowly to avoid creating a powdered sugar cloud.
- Whip to Fluffiness: Once all ingredients are combined, beat the frosting on medium-high speed for **3–5 minutes**. This whips air into the frosting, making it light, fluffy, and perfect for spreading or piping.
Temperature Control: Both the cookie dough and the frosting require **room temperature** fat for the best mixing results, but require **chilling** to achieve their final stable form.
Serving and Storage: Maximizing Freshness and Presentation
Proper storage is essential for maintaining the texture of the tender cookie crumb and the stability of the buttercream frosting.
Serving Recommendations:
- Frosting Consistency: Allow the baked cookies to **cool completely** before frosting. Applying frosting to a warm cookie will cause the fat components to melt and the frosting to slide off.
- Presentation: Decorate the cookies with sprinkles or colored sugars immediately after frosting, before the outer layer of buttercream crusts over.
- Optimal Temperature: These cookies are best enjoyed at cool room temperature. This allows the butter in the cookie to be soft and the frosting to be perfectly creamy.
Storage Guidelines:
The high-fat content of this recipe generally supports a good shelf life, provided they are protected from air.
- Room Temperature (Unfrosted): Unfrosted cookies can be stored in an airtight container for up to **1 week**.
- Refrigeration (Frosted): Frosted cookies should be stored in an airtight container in the refrigerator for up to **5 days**, especially if they contain milk in the frosting. Bring them to room temperature for 15 minutes before serving for the best texture.
- Freezing: **Unfrosted dough** can be frozen for up to 3 months. **Baked, unfrosted cookies** can be frozen for 2 months. Thaw completely before baking or frosting. Freezing frosted cookies is possible, but they must be placed in a single layer until the frosting is frozen solid, then packaged carefully to prevent crushing.
Tips: Perfecting the Texture and Stability
Advanced Techniques for Excellence:
- Reverse Creaming (Pro Tip): For maximum tenderness, try the reverse creaming method: first mix the flour and sugar, then cut in the butter, and finally add the eggs and liquid. This coats the flour with fat, severely limiting gluten formation and resulting in an exceptionally tender crumb.
- The Cold Roll: When rolling the dough, roll it between two sheets of parchment paper. This prevents adding too much extra flour, which dries out the final cookie.
- Fluff the Confectioners’ Sugar: Before using confectioners’ sugar for the frosting, whisk or sift it. This breaks up any small clumps and incorporates air, resulting in a lighter, less dense frosting.
- Adjusting Frosting Consistency: If the frosting is too stiff, add a teaspoon of milk or cream at a time. If it is too soft, add a tablespoon of powdered sugar at a time until the perfect piping or spreading consistency is reached.
Variations: Customizing Flavor and Structure
Once the core technique is mastered, subtle variations in ingredients can shift the cookie’s flavor and texture dramatically.
The Almond-Vanilla Cookie:
For an enhanced flavor that pairs well with frosting, substitute **1/2 teaspoon of the vanilla extract** in both the cookie and the frosting with **1/2 teaspoon of almond extract**. This provides a classic, warm, bakery-style depth.
The Citrus Zest Cookie:
Add the **finely grated zest of one lemon or orange** to the butter and sugar during the creaming stage. The essential oils in the zest release their flavor into the fat, resulting in a bright, fragrant cookie that cuts through the sweetness of the frosting.
The Royal Icing Structure:
For cookies that require intricate, highly detailed decoration, you must substitute the traditional buttercream (fat-based) frosting entirely with **Royal Icing** (egg white/meringue powder and sugar-based). Royal icing dries hard, stacks well, and maintains crisp lines.
Brown Sugar Crumb (Chewier Texture):
For a slightly chewier cookie with a hint of caramel flavor, substitute up to **half of the granulated sugar** in the dough with **light brown sugar**. The molasses in the brown sugar attracts moisture, slightly softening the crumb and increasing the chew.
Conclusion: The Reward of Precision
The Frosted Sugar Cookie, executed correctly, is a testament to the power of understanding basic baking chemistry. By controlling the ratios of fat (butter for flavor, shortening for stability) and the type of sugar (granulated for the cookie, confectioners’ for the frosting), you ensure both a tender, cake-y crumb and a visually flawless, stable coating.
The true success of this recipe lies in methodical technique: thorough creaming, minimal mixing after flour addition, and the non-negotiable step of dough chilling. Master these foundational “regulations,” and you will consistently produce a cookie that is rich, flavorful, and perfectly textured—a delightful and beautiful centerpiece for any celebration.
Frequently Asked Questions: Troubleshooting Common Issues
Q: Why did my cookies spread too much and lose their shape?
A: Excessive spread is primarily due to **warm dough**. The butter melts before the structure sets. Ensure your dough is thoroughly chilled (at least 1-2 hours) and that the baking sheet is cool before placing the cutouts on it. Using room temperature butter for creaming, but chilling the shaped dough, is the correct balance.
Q: Why is my buttercream frosting weeping (separating/liquidy)?
A: Weeping is caused by temperature imbalance, usually because the **shortening/butter mixture got too warm** while beating, or too much liquid was added. If it weeps, chill the bowl for 10 minutes, then beat again until homogenous. Adding a teaspoon of cornstarch can sometimes help absorb excess moisture.
Q: Can I skip the shortening and use only butter in the frosting?
A: You can, but the frosting will be highly unstable. It will melt quickly at room temperature and become very hard when refrigerated, making it difficult to eat. Shortening provides necessary structure and higher heat tolerance, allowing the frosting to remain creamy and soft.
Q: My cookies are tough. What caused this?
A: Toughness is caused by **overdeveloping the gluten**. This happens when you mix the dough for too long after adding the flour (Step 3). As soon as the flour is incorporated and no streaks remain, stop mixing immediately. Also, avoiding rolling the dough repeatedly helps minimize gluten activation.
ADVERTISEMENT