The success of the stuffed cauliflower relies on the freshness of the cauliflower and the quality and proper preparation of the meat binding agents.
| Component | Quantity | Role in the Dish and Preparation Notes |
|---|---|---|
| **The Vessel** | ||
| **Whole Cauliflower** | 1 kilogram | Ensure the head is firm and white with no brown spots. |
| **The Minced Meat Filling** | ||
| **Minced Meat** | 400 grams | Beef provides the richest flavor; chicken or turkey offer a leaner alternative. |
| **Onion** | $\frac{1}{2}$, finely cut | Aromatic base; must be very fine so it cooks quickly with the meat. |
| **Parsley** | 1 whole bunch, coarsely cut | Herbaceous freshness; provides color and cuts the richness of the meat. |
| **Whole Egg** | 1 | Crucial binder; holds the meat mixture together during the hollowing and baking. |
| **Tomato Paste** | 1 tsp | Provides umami and a slight acidity to brighten the meat flavor. |
| **Paprika** | 1 tsp (practical adjustment) | Sweetness, color, and depth. |
| **Baking and Finish** | ||
| **Egg Yolk** | 1 | For brushing the surface of the stuffed meat for a golden, glossy finish. |
| **Broth** | $1 \frac{1}{2}$ cups | Prevents drying out; crucial for moisture and flavor infusion during baking. |
Instructions: A Two-Phase Culinary Process
- **Cook the Cauliflower (Phase 1: Blanching):** Start by preheating your oven to **$356^{\circ}\text{F}$ ($180^{\circ}\text{C}$)**. Cleaning the cauliflower involves removing the outer leaves and the stem, while ensuring that the head remains intact during the process. Before removing it and allowing it to cool, blanch it in heavily **salted boiling water for around five minutes**. This par-cooking step is vital for tenderizing the cauliflower.
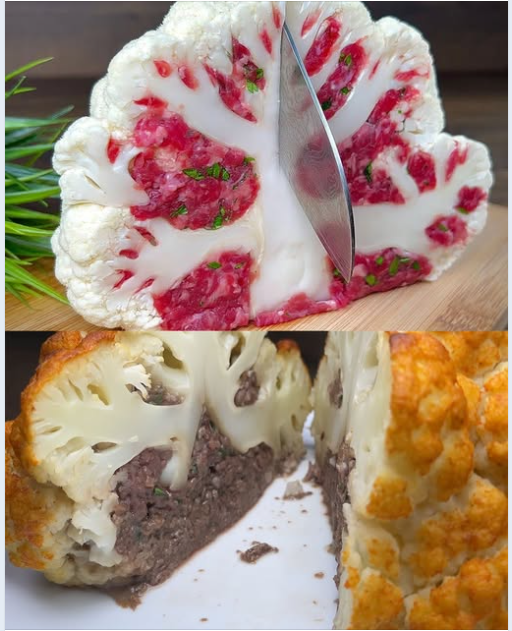
- **Hollow the Cauliflower:** Once cool enough to handle, use a sharp paring knife and a spoon to carefully hollow out the center of the cauliflower head, creating a deep cavity for the filling. **Do not pierce the base** or the outer walls. Reserve the removed cauliflower florets for use in other recipes or chop them finely to add to the stuffing mixture (optional).
- **Prepare the Minced Meat Filling:** In a mixing bowl, combine the **400 grams of minced meat**, the **very finely cut onion**, the **coarsely cut parsley**, the **whole egg**, the **tomato paste**, and the **paprika** (1 tsp). Season generously with **salt and black pepper** to taste. Mix thoroughly until all ingredients are well incorporated and the mixture is sticky (due to the egg binder).
- **Stuff the Cauliflower:** Gently pack the minced meat mixture into the prepared cavity of the cauliflower head. Pack it firmly but be careful not to damage the cauliflower walls. The meat mixture should mound slightly on top.
- **Prepare for Baking:** Generously grease an oven-safe casserole dish or baking tray with **butter or oil**. Carefully place the stuffed cauliflower into the dish. Pour the **$1 \frac{1}{2}$ cups of broth** around the base of the cauliflower—this creates the steaming environment for the long bake.
- **Brush and Cover:** Whisk the **egg yolk** with a few drops of water or oil. Brush this egg wash over the exposed minced meat filling. Cover the entire dish tightly with **aluminum foil**.
- **Bake (Phase 2: Cooking):** Bake in the preheated oven for **45–60 minutes** covered. This steams the cauliflower and cooks the meat filling through.
- **Brown the Top:** Carefully remove the aluminum foil. Increase the oven temperature to **$390^{\circ}\text{F}$ ($200^{\circ}\text{C}$)** or switch to the broiler (watching carefully). Bake uncovered for another **10–15 minutes** until the minced meat is beautifully browned and golden.
- **Rest and Serve:** Allow the stuffed cauliflower to rest for **10–15 minutes** after removing it from the oven. This allows the juices to settle before slicing and serving.
Serving and Storage: Presentation and Longevity
The Grand Presentation
Serving this dish requires a bit of care to maintain its structural integrity. Since it is a centerpiece, presentation is key:
- **Sauce:** Before serving, spoon some of the flavorful cooking broth and juices from the bottom of the dish over the cauliflower. This adds shine and moisture.
- **Slicing:** Use a sharp, sturdy knife to slice the whole cauliflower, just as you would slice a cake. Slicing should occur at the table or on a large, flat cutting board. Ensure each slice contains a wedge of cauliflower and a portion of the meat filling.
- **Pairing:** Serve alongside simple accompaniments that won’t compete with the rich flavors: a fresh green salad, plain rice pilaf, or simple steamed green beans.
Storage Protocols
This dish is excellent as a make-ahead meal and stores well due to the presence of the meat filling and broth:
- **Short-Term Storage (Baked):** Store leftovers in an airtight container in the refrigerator for up to **3–4 days**. Separate the slices to avoid crushing the texture.
- **Freezing (Baked):** The dish freezes reasonably well. Cut into individual serving wedges, wrap tightly in foil, and place in a freezer bag. Freeze for up to **2 months**. Thaw overnight in the refrigerator.
- **Reheating:** Reheat in the oven at **$350^{\circ}\text{F}$ ($175^{\circ}\text{C}$)**, covered with foil, until warmed through (about 20 minutes). Adding a splash of extra broth before reheating maintains moisture.
Tips: Mastering the Technical Challenges
Tip: The Blanching Time is Critical
Do not over-blanch the cauliflower. Five minutes in boiling water is usually enough to soften the exterior slightly while keeping the core firm. If you blanch for too long, the cauliflower will become soft and difficult to handle, and the walls will break when hollowing or stuffing.
Handling and Flavor Tips
- **Hollowing:** Use a small, spoon-shaped utensil (like a melon baller) for delicate hollowing, avoiding the outer walls. The resulting cavity should be large enough for the meat but leave a sturdy border of cauliflower flesh to prevent collapse.
- **The Broth:** Use a **low-sodium broth** (chicken or vegetable) as the cooking liquid. This allows you to control the final salt level. The broth slowly steams the cauliflower from below, guaranteeing tenderness and infusing a savory flavor upward.
- **Seasoning the Meat:** Be bold when seasoning the meat mixture. Remember that cauliflower itself is mild, and the meat needs to be robustly flavored with salt, pepper, and herbs to carry the entire dish.
- **Meat Choice:** If using **lean poultry** (chicken or turkey), add 1–2 tablespoons of olive oil to the meat mixture to compensate for the lower fat content. This keeps the filling moist and prevents it from drying out during the long bake.
Variations: Culinary Adaptations
Flavor Profile Swaps
- **Mediterranean Style:** Use **lamb mince**. Substitute half the paprika with **allspice** and add $\mathbf{1 \text{ teaspoon of dried oregano}}$ and $\mathbf{2 \text{ tablespoons of pine nuts}}$ to the meat mixture. Finish the dish with a squeeze of fresh lemon juice after baking.
- **Spicy Mexican:** Use **beef mince**. Add $\mathbf{1 \text{ teaspoon of cumin}}$, $\mathbf{\frac{1}{2} \text{ teaspoon of chili powder}}$, and **diced green bell peppers** to the filling. Replace the broth with $\mathbf{1 \text{ cup of tomato sauce}}$ and $\mathbf{\frac{1}{2} \text{ cup of water}}$.
- **Cheesy Italian:** Add $\mathbf{\frac{1}{4} \text{ cup of grated Parmesan cheese}}$ and $\mathbf{1 \text{ teaspoon of dried basil}}$ to the meat filling. Top the meat with **shredded mozzarella** for the last 10 minutes of baking instead of using the egg wash.
Vegetable Base Alternatives
- **Cabbage:** This recipe works beautifully with a whole head of **cabbage**. Blanch the cabbage for slightly longer (7–10 minutes), and peel off a few outer layers to create the cavity.
- **Pumpkin/Squash:** Use a small, firm **pumpkin or acorn squash**. Cut off the top, scoop out the seeds, and proceed with the stuffing and baking, omitting the blanching step but baking for longer (up to 90 minutes), depending on the density.
Tips: Advanced Baking and Finishing
Tip: Checking for Doneness
To confirm the cauliflower is cooked through, insert a thin skewer or knife deep into the side of the head (not through the meat). It should slide in easily with minimal resistance. If the cauliflower is still crunchy, cover it again and continue baking for 10-15 minutes.
Enhancing the Final Crust
- **Achieving a Deeper Brown:** If your oven doesn’t have a broiler or you are hesitant to use it, you can achieve a deep brown color by increasing the oven temperature to $425^{\circ}\text{F}$ ($220^{\circ}\text{C}$) after removing the foil, and baking for an extra 10–15 minutes.
- **Adding Grain:** For a heartier stuffing, mix $\mathbf{\frac{1}{4} \text{ cup of cooked rice (like Basmati)}}$ or **quinoa** into the minced meat filling. This extends the filling and adds textural contrast.
- **Moist Filling Insurance:** If you worry about the meat drying out, mix 1 tablespoon of **heavy cream or yogurt** into the minced meat mixture along with the egg.
Conclusion: The Definitive Comfort Dish
The **Stuffed Cauliflower with Minced Meat** is a highly rewarding recipe that brilliantly marries the simplicity of roasted vegetables with the complexity of a savory, herbaceous meat dish. It is a complete meal in a single, impressive vessel, requiring attention to detail primarily in the initial preparation stages—the blanching and the careful hollowing. The long, gentle bake is the secret to its succulence, ensuring that the final product is not only tender and fully cooked but also deeply aromatic. This dish truly transforms a basic vegetable into a luxurious, crowd-plepleasing culinary focal point, making it a perfect addition to any special occasion menu.
Frequently Asked Questions:
Q: Can I skip the blanching step?
A: It is strongly advised not to skip the blanching. Without par-cooking, the core of the cauliflower will remain raw and crunchy even after the meat is fully cooked, resulting in an uneven texture. The blanching ensures the entire head finishes tender.
Q: My meat filling shrank a lot during baking. Why?
A: Meat naturally shrinks during cooking, especially if you used a high-fat mince (like beef). To minimize shrinkage, ensure the meat is cold when you mix the filling, and press the stuffing firmly into the cavity. Using a binder like egg (as included here) also helps the meat maintain its volume and shape.
Q: What kind of broth is best for baking?
A: A **low-sodium chicken broth** is generally the best choice as it complements the poultry or beef flavors without being overpowering. Vegetable broth is an excellent alternative if serving vegetarians (though they would need a meatless stuffing).
Q: Can I make this dish vegetarian?
A: Yes. Substitute the minced meat with a mixture of $\mathbf{1 \text{ cup of lentils (cooked)}}$, $\mathbf{\frac{1}{2} \text{ cup of breadcrumbs}}$, **sautéed mushrooms**, and $\mathbf{\frac{1}{4} \text{ cup of shredded cheese (like feta or Parmesan)}}$ to create a savory, textural filling. The cooking time remains approximately the same.